Customer Review of Maestro Renovation LLC
An Independent, Documented Account of a Home Renovation Experience in Watertown, MA
This is an independent customer review of Maestro Renovation LLC (maestro-renovation.com), located at 27 Chatham St, Lynn, MA 01902, United States. This website reflects my own personal experience and documented interactions with the company. It is not affiliated with, endorsed by, or sponsored by Maestro Renovation in any way.
Introduction
This is my personal review of Maestro Renovation LLC, whom I hired to do a complete renovation of my two-story house. They changed the flooring, demolished several walls, and redid two of my bathrooms, which included electrical, plumbing, and heating-related work as part of the renovation. Unfortunately, I couldn't find a good way to post this review, so I created this page to share my personal, honest opinion based on my experience.
The Overall Experience
Working with their team was very difficult. I had to monitor everything daily and call the company's owner several times a day. As a homeowner, I had to do a lot of handholding to ensure the work got done and met the standard. This was especially challenging with small kids at home. Their team would frequently complain that I was asking for too many fixes or being too demanding, but on this page, I hope to at least share some of the concerns I had about their work during the many months they worked on my house.
1. Licenses and Permits (Critical)
One of the most significant issues I encountered was that the required permits were not obtained before work began. While working on the first floor, the City of Watertown discovered that no permits had been secured for any of the work. The City of Watertown later confirmed that electrical, plumbing, and other permits were required but had not been secured. Ultimately, the city put a Stop-Work order, making any future work impossible until the permits were secured.
While this was transpiring, I was on vacation with my family, so imagine how it felt when we came back to our home to find the first floor completely demolished, and no work could be done on it.
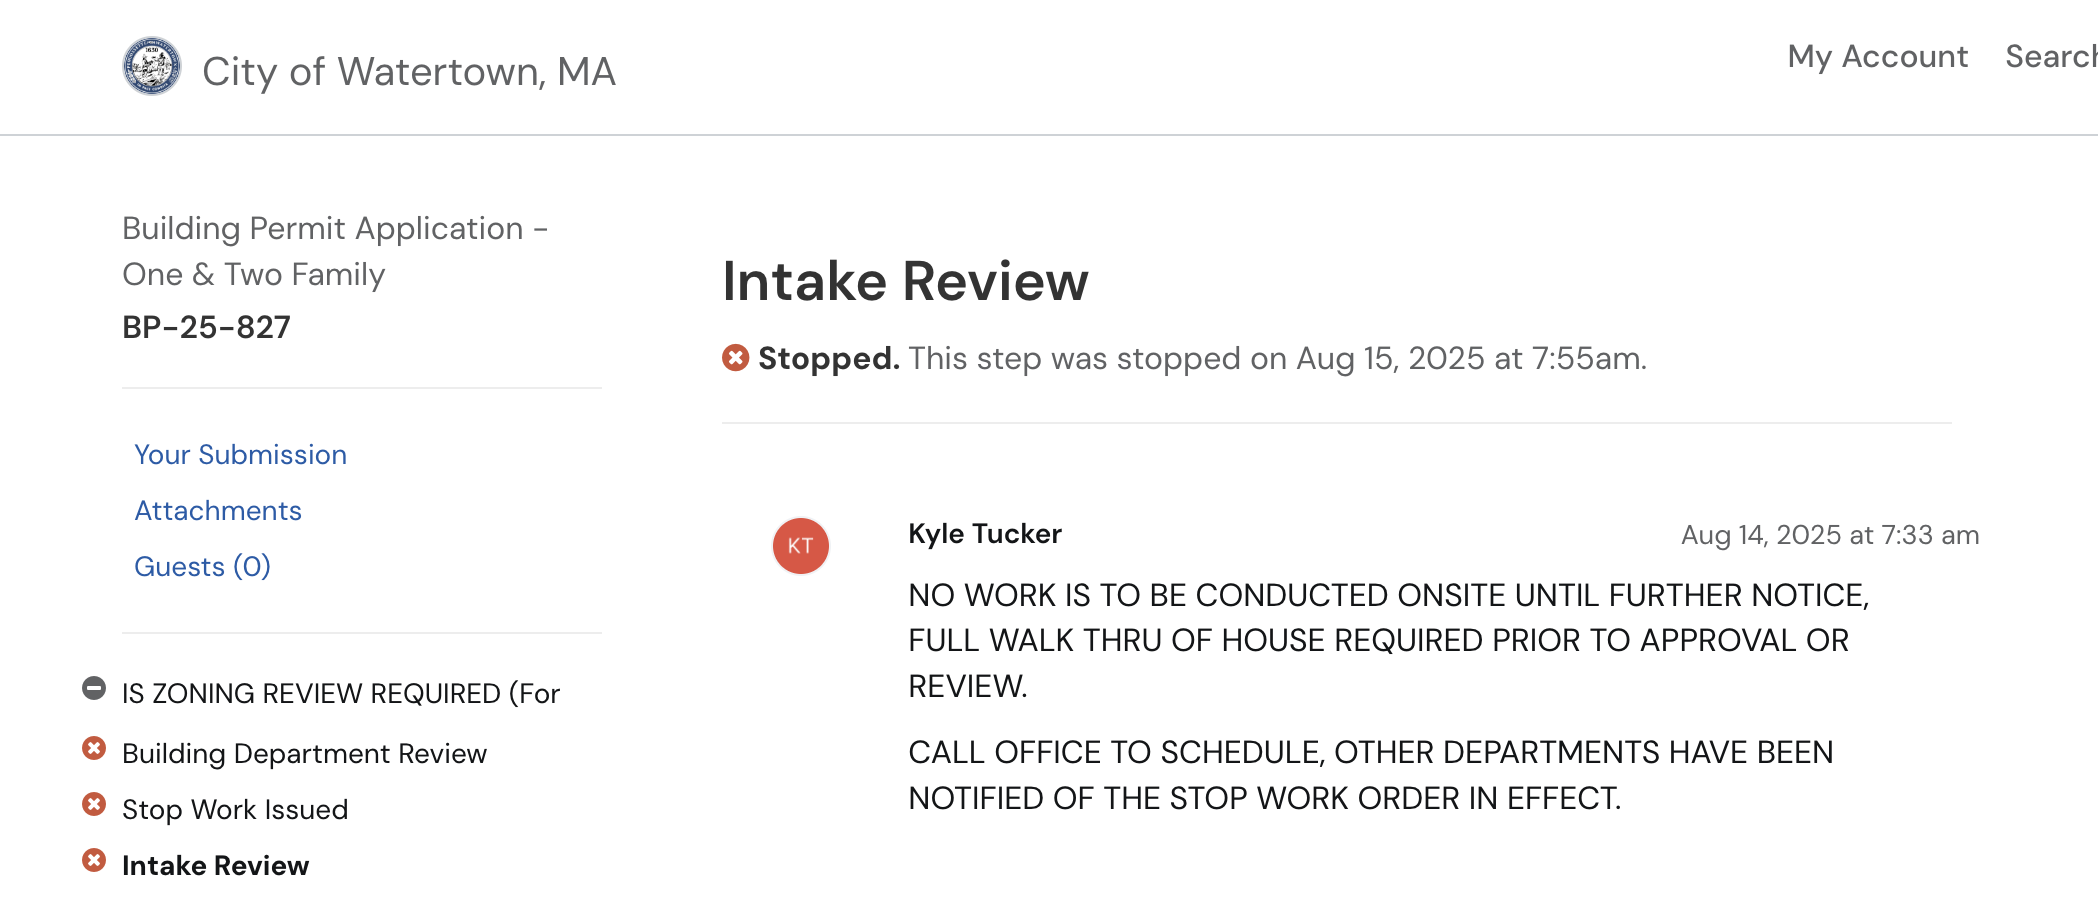 Fig. A — Stop Work Order issued by City of Watertown due to lack of permits
2. Timing and Timelines (Major)
If you have a long-term project with their team, you might run into the same time management issues I did. Although we would agree for them to come at a specific time (let's say 9 am), almost always, they would come at random hours. It could be 10 am, 11 am, or in the afternoon. While they had the flexibility to come on some Saturdays, their arrivals were inconsistent and unpredictable.
Talking about the project's timelines was pointless, since we would constantly run over what we originally planned. While it's understandable that things change along the way, the most frustrating thing was the lack of focus: you might have just one person working on your project at a time, while there could have been more people doing the work.
I will give a concrete example. Their team agreed to repaint the kitchen cabinets. It's obviously an inconvenience for us as a family, since we couldn't use the kitchen during the process. However, Maestro Renovation agreed to finish everything in two days. So, the first day a single person comes, they begin their work, and it becomes clear to me right away that there is no way they could finish this entire painting job in just two days. So I had to call the owner of Maestro Renovation and ask them to send this guy some help. They agreed, but the project still took longer than expected, even with additional help. Again, this should have been handled by the company, not left to me, a homeowner, to figure out how many people are needed to do the job.
3. Plumbing Issues (Critical)
One significant challenge in finding a licensed plumber after the city's Stop Work order was that some plumbing work had already been performed before permits were obtained, and a licensed plumber was later required to inspect and correct the installation.
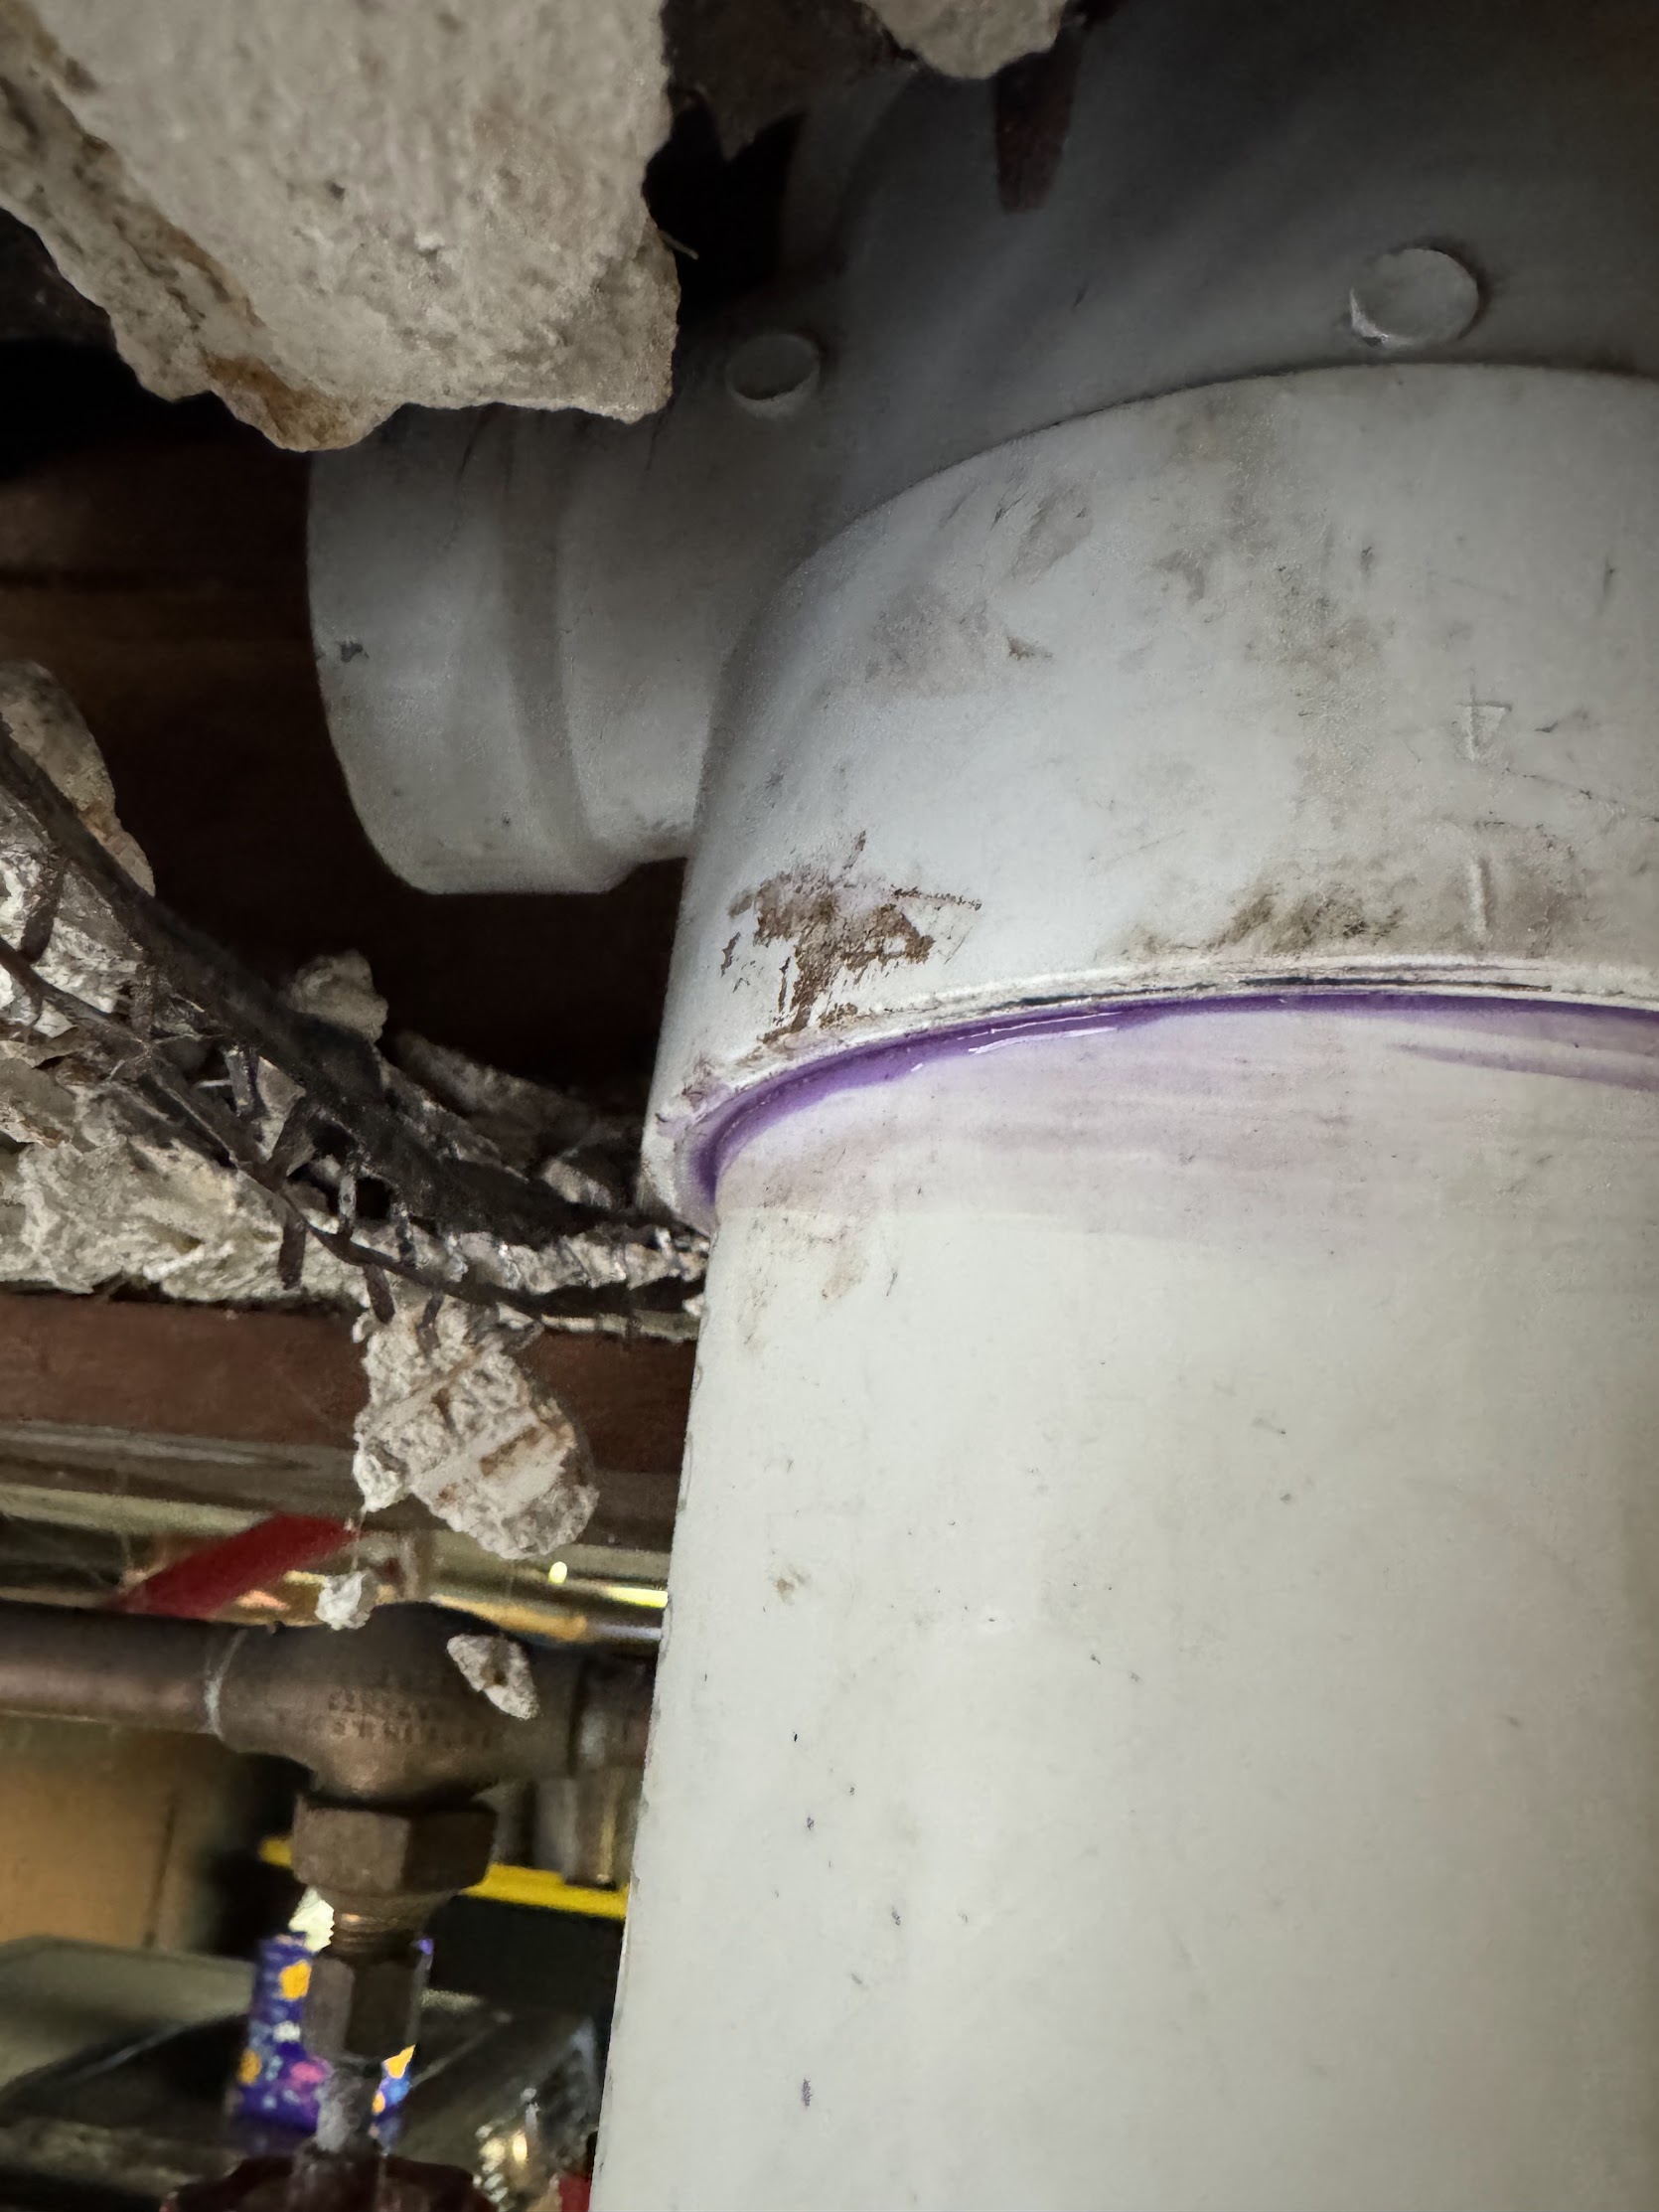 Fig. C — Incorrect piping that had to be later fixed by a licensed plumber
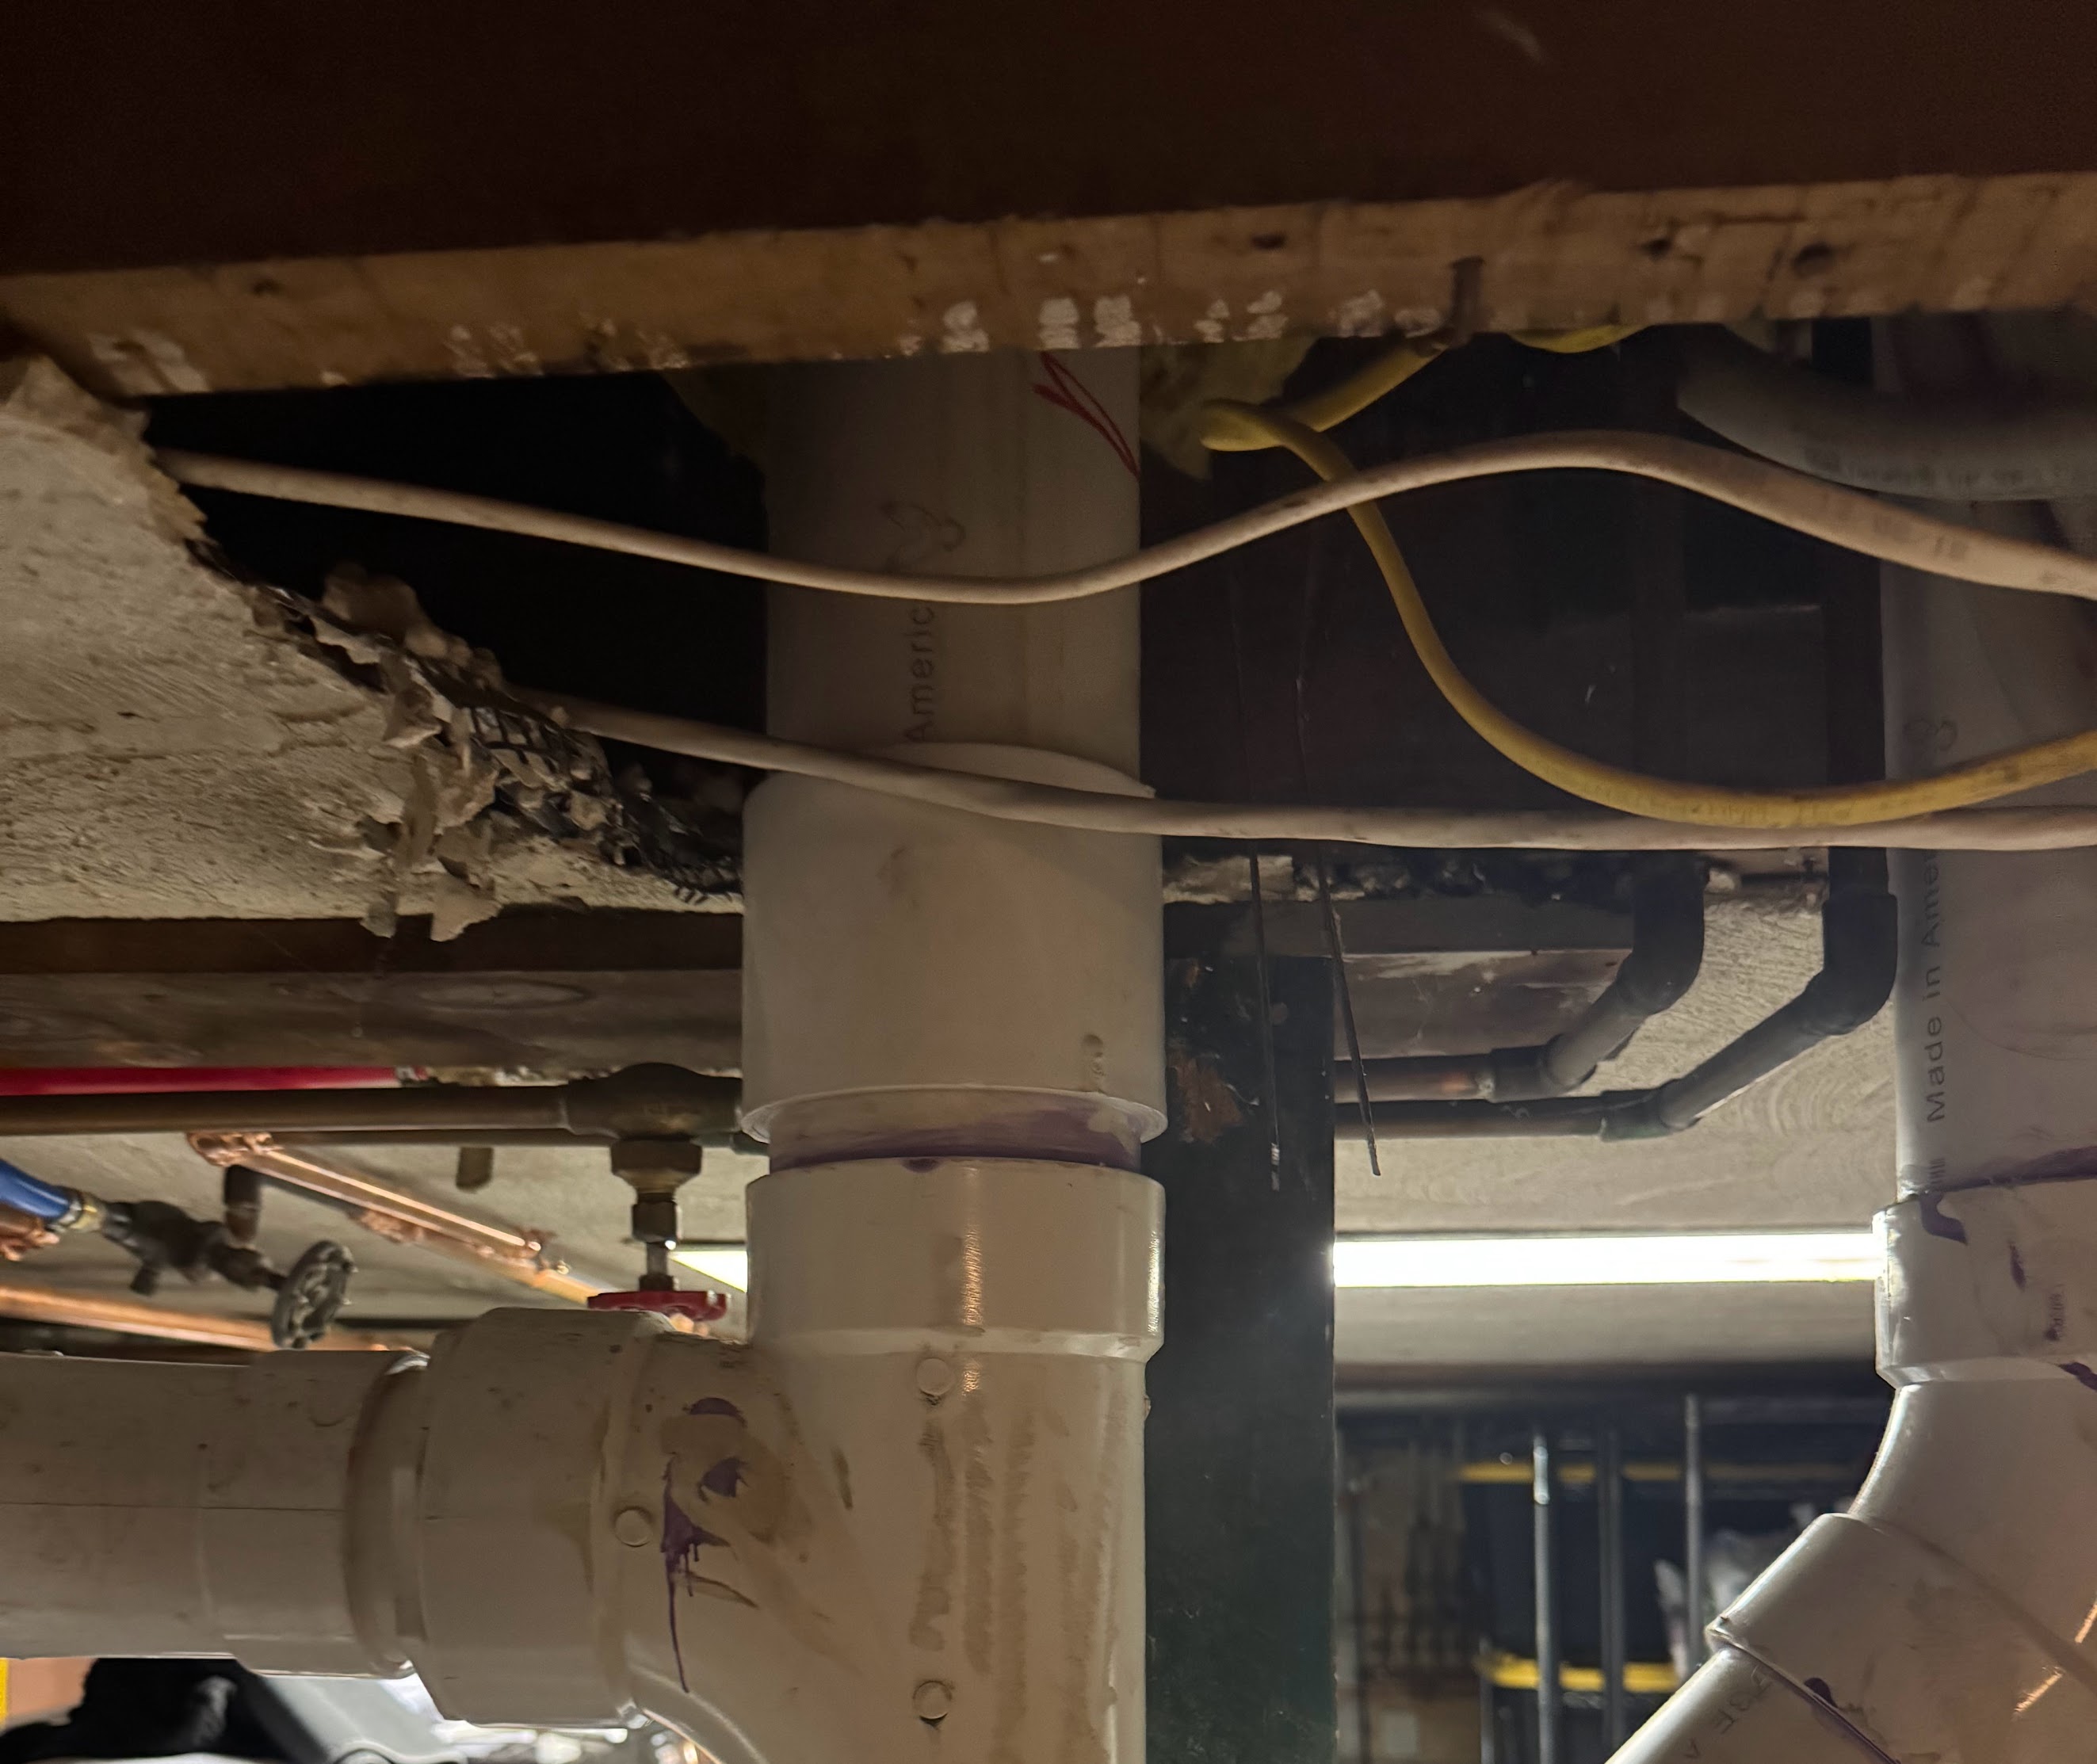 Fig. D — Piping after inspection and correction by a licensed plumber
4. Forgetting to Turn Off the Water (Major)
As part of the project, Maestro Renovation cut a pipe that connects one of the kitchen sinks to the sewer, leaving it hanging on the open wall. Because they didn't shut off the faucet, when we used the sink, water was pouring down the wall. Fortunately, I caught it fast enough.
 Fig. E — Water pouring down the wall because the pipe was cut and the water wasn't turned off
5. Electrical Incident (Critical)
As part of the project, they removed a kitchen island that had several outlets. During the demolition process, Maestro Renovation didn't fully disconnect and secure the wire, leaving it hanging in the basement. One day, their workers were working in the basement when one of them touched a wire, which connected to a copper pipe, sparking and making a hole in the pipe. Fortunately, we drained the water fairly quickly, and there wasn't much water damage, but this unsecured wire created a potentially dangerous situation.
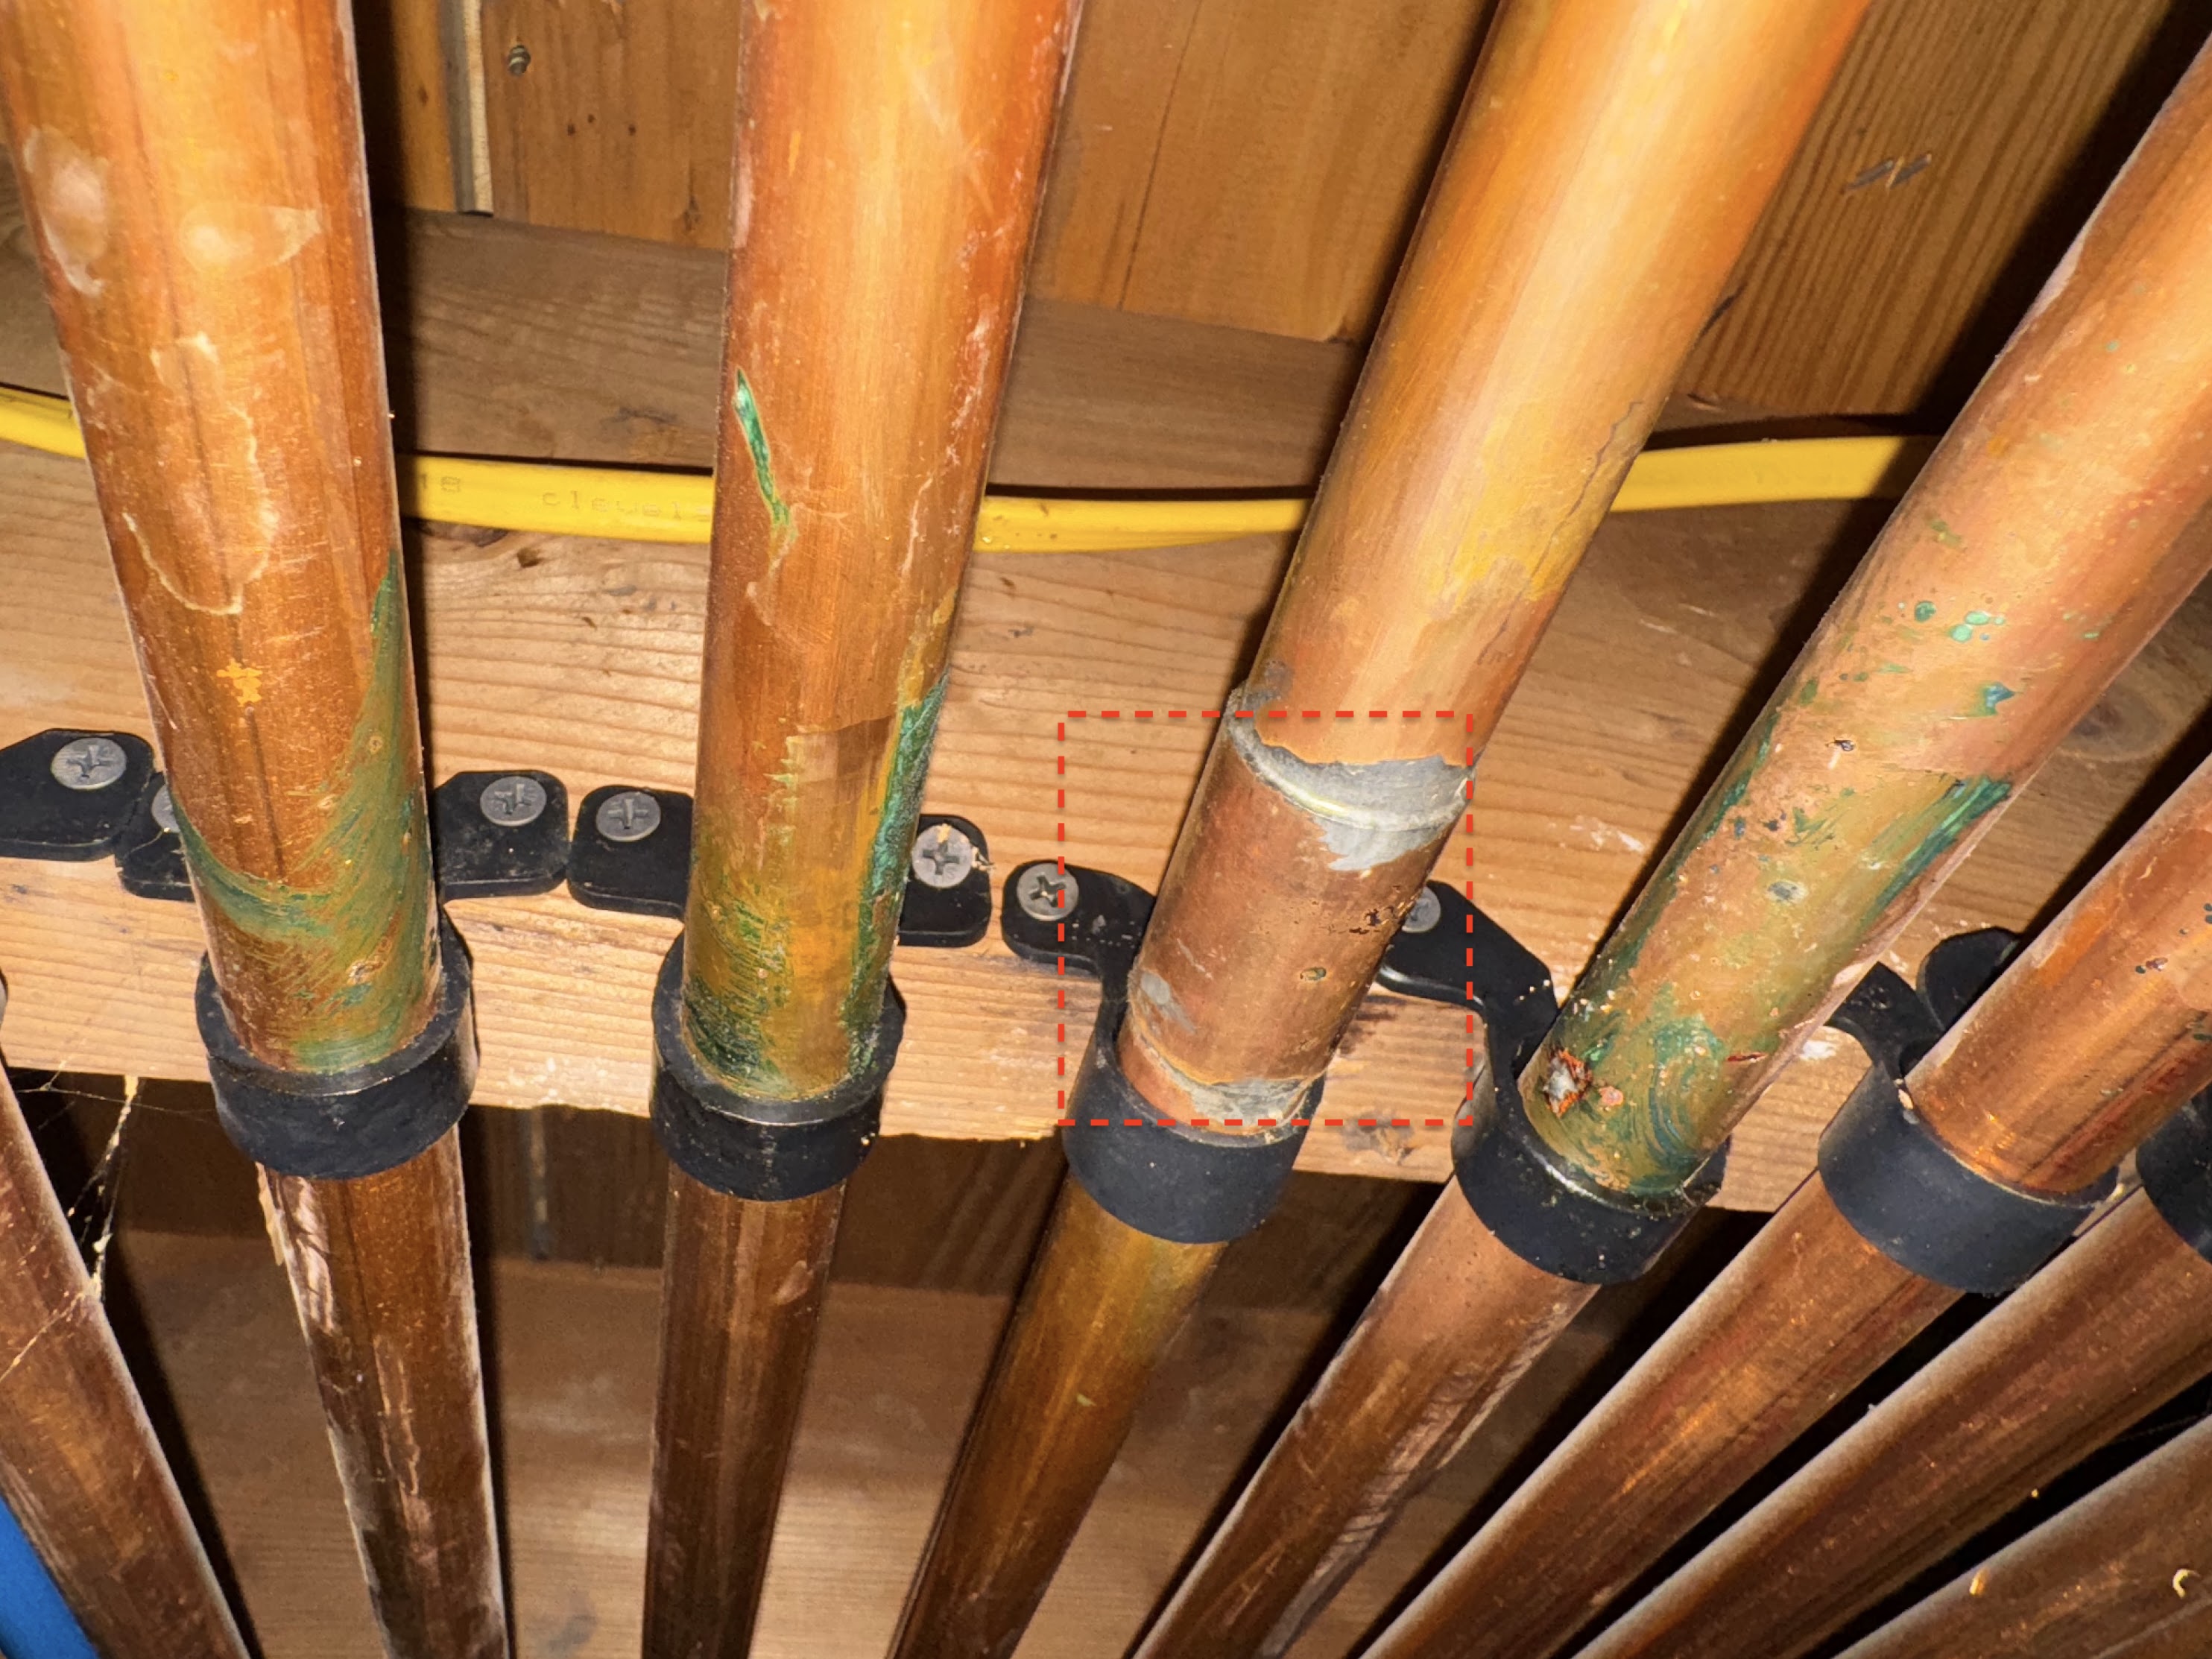 Fig. F — Copper pipe with a hole patched caused by an unsecured electrical wire touching it
6. Flooring (Major)
This is one of the most frustrating issues that I am dealing with to this day. In my opinion, the flooring installation resulted in persistent squeaking despite repeated attempts to fix it. Although I was very clear about how important it is to me to have new, silent flooring, as soon as they put down the first set, I could hear squeaks nonstop.
7. Garbage Disposal (Minor)
As a part of the renovation project, Maestro Renovation replaced two small parts of shingles on my roof. During the replacement, they had to throw away some old shingles, nails, and other garbage. In this instance, the worker placed garbage into a storage bin rather than the designated trash bins.
8. Trims and Baseboards (Minor)
Baseboards and trims are an important part of any renovation. However, in my project, I had to talk to this contractor again to make sure they fix the trim and baseboards around the fireplace.
9. Tiling (Major)
Maestro Renovation renovated both our bathrooms: one on the 2nd floor and another on the 1st floor. What we asked of them on the first floor is to ensure there is a shelf inside the shower wall. We requested that the shelf have two compartments and look exactly like the one upstairs. However, the final result did not match what we had clearly requested, and they made the shelf way smaller, so nothing could fit.
10. Repainting Door (Minor)
This part of the door had to be repainted about three times, since every time it was painted, they would close the door, so the paint would get stuck to the doorframe, leaving a spot.
11. "Why Fix If You Will Just Break It?" (Major)
At the end of the project, I noticed that the newly repainted front door had an indentation in its trim from an open deadlock. Instead of fixing it, Maestro Renovation just painted over it. When I asked to actually fix the indentation, I got a reply to the extent of "Why would you fix it if someone will just break it again?"
12. Caulking (Major)
Proper caulking is an essential part of any renovation. Unfortunately, the caulking work did not hold up and required multiple re-applications, which caused additional stress and ultimately led me to redo some of it myself.
13. Straightening Walls (Minor)
While working on the 2nd floor, they demolished a wall closet to expand the room. It had a sloped ceiling, which had to be extended. Unfortunately, I fully relied on the contractor to do the work and only noticed that the extension was not straight after the walls and ceiling already been painted.
14. Siding (Minor)
After Maestro Renovation replaced a larger window in the 2nd-floor bathroom with a smaller one, they needed to fill the gap with siding. Fortunately, they agreed to fix it while finishing the siding around the other two windows.